Thursday, September 2, 2010

Bedroom Before Pictures


This is a poor shot of our bedroom "before."
Pink walls.
No bedframe...mattress and boxspring directly on the carpet.
Mismatched furniture.
Giant room.
No artwork.


Here is the cedar chest before it's makeover.

Very sad state of affairs.

What to do?
Suggestions?

Tuesday, August 31, 2010

Green Ziplocs

I HATE sending lunch food for my kids in plastic baggies.
In our family it seems like I could go through a box of
one hundred baggies in the coarse of a month...sometimes less.
2 Kids. 2 adults.
Each lunching and snacking outside the home5 days a week.
One baggie for a sandwich, another for a veggie, another for a cookie, ANOTHER for chips.
It was a world gone mad with baggies.

Hopping on the green bandwagon, I finally made some re-useable baggies for our lunching needs. Being that I can't make just one, and things get dirty, I've made somewhere in the 20's. All different sizes and shapes. (Here is a great starter tutorial.) While researching tutorials online I noted that most crafters out there were using age appropriate fabrics, tough for a an almost Middle schooler and almost High Schooler. No Thomas the Tank Engine and Tinkerbell fabric requests being made from our home. What to do?


Freezer paper stenciling. I love it.
Start with some of this...


Cut your fabric. I used pieces that were 6 inches wide and 12 inches tall.
Go online and Google search for what you are looking for in Google Images.
I used catch phrases like guitar silhouette, snowboarding silhouette, dog silhouette, etc.
When choosing my designs I chose things that had little or no white
within the design just to make it easier on myself.

file:///Users/Cara/Desktop/Weimaraner.jpg

Print out your Google finds in a word document after you've sized them.
I was going for small designs, so a word document worked well.
Tear off some freezer paper and using an exacto knife cut around your image.


You wil end up with an outline that you can easily iron down on your fabric.
I folded my fabric in half to simulate how it would be sewn when the baggie was done.


Next I took some fabric paint, available at any craft store or fabric store.
Look in their acrylic paint section. If you cannot find fabric paint specifically,
buy a bottle of fabric binder that will turn any acrylic paint bottle
into paint appropriate for fabrics. Please use fabric paint!
Your laundry with thank you later!
Using a sponge (I used one that I had cut up from the kitchen)
dab the paint onto the fabric.
Careful to unfold your fabric...the paint will seep through!


I peel my freezer paper off immediately and let dry before sewing.


Thursday, August 19, 2010

Beachy Project


We are all about the beach.
And when we are on the beach, the entire family
is on the look out for interesting shells
and beach finds.

Our beach finds have been sitting in on our guest bath
countertop in matching jars, labeled with the beach
name and date we found the shells.
Very nerdy. Very scientific.

Upon our return from our latest destination,
our bathroom still had bare walls and
I was out of jars to put our latest stash in.
What to do?

1. Buy a stack of $4.00 shadow box frames from my local Michael's store.
2. Have my kids type out our beach name and date information
on a piece of cardstock, centering the lettering on the page.
3. Measure the frame opening and cut the cardstock
down to the frame opening less a half inch.
4. Arrange the shells on the cardstock artfully.
5. Hot glue the shells down one at a time to retain arrangement.
6. Using pretty straight pins, pin the paper to the
fabric of the shadowbox.
7. Repeat.
8. Hang.

Tuesday, August 17, 2010

Jeans Recycling Part Duex

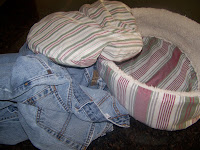
Chloe the dog has a tired old dog bed.
Chloe the dog loves her alpha.
Chloe would like nothing more than to have a new
bed made from two pair of her alpha's tired old jeans.
.
Chloe is a little dog.
She is 11 pounds after a big meal.
The "pillow" portion of her bed measures only 16" across.

I dug through my kitchen cupboards and found a Christmas
platter roughly 16" across I could use for a circle template.
I laid the platter on my jean leg and traced 3 circles.
One for the base of my dog bed, and two for the pillow.
I used three jean legs opened on one seam.
For the pillow, with right sides together, I sewed around the outside of the two pillow circles, leaving a 4 inch opening for turning. I turned the circles right side out. Since I had no ready made stuffing I used some old t-shirts from the donation pile for stuffing. After stuffing, I sewed the opening closed with a top stitch all the way around the circle.

I wanted the outside of the dog bed to look like the waistband of a pair of jeans. I wanted the dog bed to look like a pair of jeans thrown on the floor. In order to make the jeans have a large enough waistband, I pieced the jeans together to create a large rectangle measuring the circumference of the pillow. In order to piece the jeans, laid my rotary cutter and ruler ten inches below the waistband on each of two pair. Using one waistband as my main piece, I cut pieces out of the second pair and added them to the main waistband to "expand" the waist to measure the circumference. When adding pieces, I layered the new pieces over the main piece and sewed them on without bothering to sew rights sides together.
I figure when the bed is washed the raw edges will fray nicely.
When sewing the rectangular piece for the outside of the dog bed
I sewed exclusively on the pre-existing orange stitching, except
when adding the extra width for the circumference.
When sewing the extra width, I used a grey thread that disappeared
when sewing over the denim.

For some color, I added a pair of my husbands boxers to the fly of the jeans!
I created a matching rectangular strip from the remaining jean leg and sewed the two rectangles together with right sides matching. Once together, I sewed the outside to the remaining center circle, again leaving the raw edges to fray.
Voila! A new dog bed for Chloe that is cool enough for any room!


Recycling Jeans

Last weekend we (my husband and I) went jeans shopping. For him. To be honest, husband, has not purchased a new pair of jeans in a LONG time. His old jeans were from Costco. It's not that I don't love Costco, but we haven't lived in Costco-range for hmmm...12 years.

The shopping proved to be quite difficult, but the resulting purge provided me with a nice supply of recycled jeans to craft. To find something worthy of the sacred jeans, I did some net research on jean recycling and didn't find anything I liked. One morning, I picked up my kids bath mat and realized that the backing was disintegrating. I decided to use some of my new stash for a bath mat.

First, I started by ripping my jean legs into 1 inch strips.


Next, I took a piece of room darkening shade material (from my stash) the size of my intendedrug. I laid a strip of jeans on the material and sewed down the center.
Once I finished the first strip I folded it to the right and laid another strip down next to the first and sewed down the middle.
Pieces were added one after the other. On end the pieces looked U shaped because each piece was sewn down the middle.

After building the pieces up I took my rotary cutter and cut off the uneven ends, squaring offthe edges. Next, I washed the rug, hoping the denim would unravel and fray. The first wash was a pain, picking all the strings off the rug when it emerged, but with each wash the rug gets cuter and cuter. I was even thinking of bleaching the rug, for a traditional white color, but decided that the blues were a a better fit with my shower curtain.

I Stink at Posting


It is true. I am a lousy post'er. To my credit, I have a new computer and just needed to figure things out AND...Ihave been really busy crafting.

So...let me get-a-posting.

CHAIR. Before.

Naugahyde. Gotta love it. We bought this chair 2 or 3 years ago at the Duke Surplus store for...wait for it...$20.00. The lines are nice, the wood is solid and nice, but the naugahyde is a littlemuch though. To match my newly painted bedroom I wanted to update the chair a bit.

First, I took it apart.

Next I measured and cut the main square piece and measured and cut the rectangle that wrapsaround the seat, making sure that I had plenty of width on the rectangle for the stapling to come. Then, I purchased some white piping and started sewing, sandwiching the piping between the two pieces of fabric.This is what Iended up with... I put the fabric over the old foam frame... and start stapling. Stapling the fabric over the frame is an art. My artist approach is to staple on one side, pulltaught and staple on the other side. Icontinue all around the frame, leaving the corners until the end. The corners are simple folding and stapling. Once the fabric is stapled on, the second row of piping is stapled over the fabric and tucked in.

I repeated the same directions for the top piece, and here is the finished product!

Tuesday, June 22, 2010

Paper Cut

So right now I am dabbling in paper cutting. I have my trusty exacto knife, some paper and a self healing mat. While doing a bit of net research on templates and gathering ideas on subjects, I came across this A*M*A*Z*I*N*G paper cutting. It is A. huge. B. all one piece. And C? Stunning. It is a single sheet of paper cut into a portrait and TIED onto a canvas. Jump to the link and see!